
Upgradeable Smart Contract on Polygon Network

Alfred is a software engineer and cyber security specialist based in Enugu, Nigeria. He is passionate about solving real-world problems through well-crafted software and leveraging blockchain technology.
Genesis 1:1
In this blog post, we will learn about upgradeable smart contracts, different upgrade patterns, reasons behind smart contract upgrades, and finally, how to utilize the Hardhat framework to aid in deploying and implementing smart contracts that can be upgraded or updated. You can always deploy and interact with upgraded smart contracts on different chains or networks, but we would deploy our contracts to the polygon network for speed, low gas fees, and security.
Prerequisites for this article include fundamental knowledge of smart contract development with solidity, some level of familiarity with terminal (bash/cmd), and good knowledge of javascript. Going forward, I'll assume you understand how the blockchain works, have prior programming experience, know what smart contracts are, and have had some time to review some polygon basics.
If you are not interested in the theoretical aspect, feel free to jump to the code section of this blog post and begin to implement an upgradeable smart contract.
What are Upgradeable Smart Contracts
Before proceeding to discuss upgradeable smart contracts, let's briefly talk a bit about some characteristics of smart contracts and the EVM. Smart contracts were created to be immutable once deployed ( assigned a hex address ), for this reason, the term "upgradable smart contracts" might be counterintuitive, but hold on 🫣.
During the process of upgrading smart contracts, you are still following the immutability law of smart contracts, but instead of making changes to the contract to be updated, you replace it with a new copy of a smart contract. It's almost like upgrading your Lexus car; upgrades are typically accomplished through "facelifting," which is the process of removing the old exterior and replacing it with new parts that are similar to those found in a later model of your Lexus car.
Let's quickly see a few reasons why you might want to make your smart contracts upgradeable:
Bug fixes before an exploit take place. to boost performance.
Modifying functionality that is no longer necessary or deemed useful. to make the code more efficient in its use of Ethereum gas. to adapt to changes in society, markets, or technology. to avoid the necessity of transferring an entire user base to a new version of the application.
How to upgrade smart contracts
There exist various methods of implementing upgradeable smart contracts, but all follow the proxy principle. The proxy principle is a software engineering practice that involves eliminating direct messaging or access to another system. For example, instead of sending requests directly to a backend server, there would exist a proxy server that receives this request and later sends it on behalf of the client or sender; this process is called a reverse proxy. A proxy would serve as a middleman between two software programs. A similar approach is implemented for an upgradeable smart contract.
So, in the context of smart contracts, there would be a proxy contract and a logic contract. Dapp users would always interact with the proxy contract, and a similar function call is made on the logic contract. Like any other smart contract, the proxy contract includes functions and data storage. As mentioned initially, users communicate directly with the proxy contract instead of the logic contract, and one would expect that a proxy contract contains similar functions as the logic contract. But that's not the case; I'll explain.
When a function call is made to a proxy contract, the contract checks if that function exists; otherwise, a fallback function is called on the proxy contract. Inside this callback function on the proxy contract are implementations that attempt to call the same function made by the user on the logic contract but in the context of the proxy contract.
In conclusion, utilizing the proxy pattern would include the need for a proxy contract and a logic or implementation contract. It's also important to note that logic contracts are the only ones that would get replaced while keeping the address of the proxy contract the same.
There are three methods of implementing a proxy pattern, which includes:
Simple Proxy Pattern
Transparent Proxy Pattern
Universal Upgradable Proxy Standard (UUPS)
To save time, we would cover just the simple proxy pattern and the transparent proxy pattern because I am kind enough.
Simple Proxy Pattern
This method of implementing an upgradeable contract basically involves a user directly calling a proxy contract instead of the logic contract. Both the proxy and logic contracts have something in common: an execution context. An execution context is basically an environment or space where code is run. Every smart contract has its own execution context. Also like any other contract, the proxy contract has its own state and by taking advantage of this we can easily replace the logic contract and still retain the state on the proxy contract.
The proxy contract uses storage variables to keep track of the address of the logic smart contract. This is how it can redirect transactions and invoke the relevant logic smart contract. Proxy contracts can make calls to the relevant logic smart contract by making use of something called a [delegateCall] (https://docs.soliditylang.org/en/v0.8.6/introduction-to-smart-contracts.html?highlight=delegatecall#delegatecall-callcode-and-libraries).
A delegate call is somehow different from a regular function call in the sense that the code at the target address is executed in the context of the calling contract. In our case, the code from the logic contract is executed in the context of the proxy contract, and state changes are eventually made on the proxy contract, therefore decoupling the application. If the logic contract’s code is meant to cause a change in storage variables, those changes are reflected in the proxy contract’s storage variables, i.e., in the proxy contract’s state.
From the look of things, we can refer to the proxy contract as the data contract, and for this reason, the proxy contract should not be replaced but rather the logic contract.
When the proxy contract receives a function call for a function that it does not support, the proxy contract’s fallback function will be invoked to handle that function. The proxy contract uses custom logic inside its fallback function, where a delegate call would be implemented to redirect calls to logic contracts.
Now that the application state and the application logic are decoupled in the EVM, we can upgrade the application by changing the logic contracts and giving the new addresses to the proxy. But the application’s state isn’t affected by this upgrade.
Transparent Proxy Pattern
Function calls initiated by the end user are always routed to the logic contract rather than the proxy contract. If the caller is an administrator of the proxy, however, the proxy will invoke its own administrative function.
Calling administrative functions in the proxy contract to manage upgradeability and other administrative tasks should only be performed by an administrator, and if a conflict occurs, it is reasonable to assume that the administrator intended to call the proxy contract's function and not the logic contract's function. If the caller is a non-administrator address, however, the proxy will always delegate the call to the relevant logic contract. The caller can be identified by examining the message.sender value.
In this pattern, the proxy contract would have logic in its fallback function to parse message.sender and the function selector that is being called, and accordingly invoke one of its own functions or delegate out to a logic contract.
Code Time: Upgradeable smart contracts with hardhat
In this section, we will be making use of the transparent proxy pattern, utilizing contracts from OpenZeppelin and Hardhat for development.
Within the Hardhat development tool lie functions like deployProxy that track the logic contract for us and give us easy access to upgrade functionality. By default, the address that deployed the contract is the one that has admin rights to upgrade it.
To create a new Hardhat project, create a new directory and name it whatever you want, then copy and run the commands below.
npm init --y
yarn add -D @openzeppelin/contracts-upgradeable @openzeppelin/hardhat-upgrades @nomiclabs/hardhat-ethers ethers dotenv
The first command will simply generate an empty npm project without going through an interactive process. The y stands for yes. The latter will download the necessary dependencies for our project.
Finally, to complete the setup for hardhat, run yarn hardhat, you'll be faced with an interactive terminal. Create a javascript project, place the hardhat project at the root, add a .gitignore file and you should be good to go.
This command would create a default ``hardhat.config.js```. This file created would be placed at the root of your project directory and comes along with some default settings which you should overwrite by pasting in the code below.
require('dotenv').config()
require("@nomiclabs/hardhat-ethers");
require("@openzeppelin/hardhat-upgrades");

const MUMBAI_RPC_URL = process.env.MUMBAI_RPC_URL
const PRIVATE_KEY = process.env.WALLET_PRIVATE_KEY_DEV;

module.exports = {
 solidity: "0.8.17",
 defaultNetwork: "mumbai",
 networks: {
   localhost: {
     chainId: 31337,
   },
   mumbai: {
     url: MUMBAI_RPC_URL,
     accounts: PRIVATE_KEY ? [PRIVATE_KEY] : [],
     chainId: 80001,
   },
 }
};
Mumbai is the testnet for the polygon network, to get an RPC URL head to alchemy and create a new app setting the network to Polygon Mumbai, then copy the HTTPS URL and paste it into your .env file. Your .env file should be placed at the root of your project and should have contents like:
MUMBAI_RPC_URL=https://polygon-mumbai.g.alchemy.com/v2/<APIKAY>
WALLET_PRIVATE_KEY_DEV=<YourPrivateKey>
You can test your setup by compiling the contracts created for you by running the command: yarn hardhat compile . This would compile all contract files in the contracts directory if it has not compiled the files in that folder before or one of the solidity files has changed beforehand, you have two new folders, “Artifacts” and “cache,” in your project directory.
Next, we would make use of the existing contract created for us by hardhat and prepare this contract to be upgradeable. To make this happen, the Lock contract needs to inherit the Initializable from openzeppelin upgradeable contract and lastly, create one important function with a name initialize. Copy and Paste the code below into your contracts/Lock.sol file and after that, I'll explain some important patterns noticed.
// SPDX-License-Identifier: UNLICENSED
pragma solidity ^0.8.9;

import "@openzeppelin/contracts-upgradeable/proxy/utils/Initializable.sol";
// Uncomment this line to use console.log
// import "hardhat/console.sol";

contract Lock is Initializable {
    uint public unlockTime;
    address payable public owner;
    address payable private admin;

    event Withdrawal(uint amount, uint when);

   function initialize(address _admin) public initializer {
       admin = payable(_admin);
       owner = payable(_admin);
   }

    function withdraw() public {
        // Uncomment this line, and the import of "hardhat/console.sol", to print a log in your terminal
        // console.log("Unlock time is %o and block timestamp is %o", unlockTime, block.timestamp);

        require(block.timestamp >= unlockTime, "You can't withdraw yet");
        require(msg.sender == owner, "You aren't the owner");

        emit Withdrawal(address(this).balance, block.timestamp);

        owner.transfer(address(this).balance);
    }
}
One thing to notice is that this contract does not have a constructor function which is weird. The reason behind this stems from a rule which states that when using Open Zeppelin upgradable contracts, we cannot include a constructor in our smart contracts.
Instead, we create our own construtor-like functionality by extending the Initializable base contract, which helps us apply an initializer modifier to the initialize() function. We can name the initialize function anything we like, but by using initialize, the Hardhat plugin will recognize it and will call that function by default. If we have an initializer function by another name, we would need to specify the name of our initializer. OpenZeppelin Contracts provides the Initializable base contract that allows you to tag a method as initializer, ensuring it can be run only once.
Deploy Contract
When deploying this contract, we will need to specify the initializer function name (only when the name is not the default of initialize) and provide the admin address that we want to use. To deploy our contract, we need to update the deploy script found in scripts/deploy.js, copy and paste the code below into the deploy file.
// The Open Zeppelin upgrades plugin adds the `upgrades` property
// to the Hardhat Runtime Environment.
const { ethers, network, upgrades } = require("hardhat");
const fs = require('fs');

async function main() {
  var dir = './deployed';

  if (!fs.existsSync(dir)){
    fs.mkdirSync(dir);
  }


 // Obtain reference to contract and ABI.
 const LockContract = await ethers.getContractFactory("Lock");
 console.log("Deploying Lock to ", network.name);

 // Get the first account from the list of 20 created for you by Hardhat
 const [account1] = await ethers.getSigners();

 //  Deploy logic contract using the proxy pattern.
 const LockContract_ = await upgrades.deployProxy(
   LockContract,

   //Since the logic contract has an initialize() function
   // we need to pass in the arguments to the initialize()
   // function here.
   [account1.address],

   // We don't need to expressly specify this
   // as the Hardhat runtime will default to the name 'initialize'
   { initializer: "initialize" }
 );
 await LockContract_.deployed();
  await fs.writeFileSync(`${dir}/proxy.txt`,LockContract_.address)

 console.log("LockContract deployed to:", LockContract_.address);
}

main();
In other to run the script and deploy our contract to the mumbai testnet, we make use of hardhat on the terminal by running the following command:
yarn hardhat run ./scripts/deploy.js
The script does a couple of interesting things:
Creates a text file under a directory where we save our deployed proxy address for easy retrieval.
Deploys our logic contract using proxy pattern and contracts interface by open zeppelin.
Initialize the contract by setting your wallet address as the admin.
Saves the address of our proxy/data contract to a file in our working directory.
Upgrade Contract
Previously we have deployed our logic contract using the proxy pattern and saved our address to a file. Moving forward, let's create an upgraded version of the lock contract. Create a new file under the contracts folder and name it contracts/upgrade_lock.sol, copy and paste the upgraded contents and we would review the code in a bit.
// SPDX-License-Identifier: UNLICENSED
pragma solidity ^0.8.9;

import "@openzeppelin/contracts-upgradeable/proxy/utils/Initializable.sol";
// Uncomment this line to use console.log
// import "hardhat/console.sol";

contract UpgradedLock is Initializable {
    uint public unlockTime;
    address payable public owner;
    address payable private admin;

    uint public ownerBalance;

    event Withdrawal(uint amount, uint when);

   function initialize(address _admin) public initializer {
       admin = payable(_admin);
       owner = payable(_admin);
       unlockTime = block.timestamp;
       ownerBalance = 50;
   }

    function withdraw(uint amount) public {

        require(block.timestamp >= unlockTime, "You can't withdraw yet");
        require(msg.sender == owner, "You aren't the owner");
        require(ownerBalance-amount > amount, "You can't withdraw that amount,too much");
        emit Withdrawal(amount, block.timestamp);

        ownerBalance -= amount;
    }
}
In our previous Lock contract, the withdraw function was defined in such a way that it would drain the contract's funds and send them to the owner. But in our current implementation of the upgraded Lock contract, we want the owner to specify the amount they wish to withdraw and also introduced a new variable to track the amount the owner has left which we can later on read because it is a public variable.
Now we have our upgraded Contract, it's time to actually write a script that would help us to upgrade our previous logic contract with a new and improved version. To do this, create a new script file and call this one scripts/upgrade_lock.js , then copy and paste the code below.
const { ethers, upgrades } = require("hardhat");
const fs = require("fs");

async function main() {

  const deployedProxyAddress = fs.readFileSync('./deployed/proxy.txt',{
    encoding: 'utf8'
  })
  console.log('Lock Contract Proxy Address: ' + deployedProxyAddress)

  const UpgradedLockV2 = await ethers.getContractFactory(
    "UpgradedLock"
  );

  console.log("Upgrading Lock Contract to V2...");

  await upgrades.upgradeProxy(deployedProxyAddress, UpgradedLockV2);
  console.log("Lock Proxy upgraded");
}

main();
In the above script we retrieve our proxy address previously deployed from the text file and supply it to the upgradeProxy function together with the contract factory of the new version of our Lock contract. Now everything looks good and ready, you can now run and upgrade your lock contract by running the following command below.
yarn hardhat run ./scripts/upgrade_lock.js
If your script runs successfully, your terminal should have a similar output as below but a different proxy contract address.
Lock Contract Proxy Address: 0x7C40C2af5073132f5C3c5cc04A270a8104Dd5E19
Upgrading Lock Contract...
Lock Proxy upgraded
✨  Done in 55.41s.
To actually verify that the contract has been upgraded, you shouldd visit the address on polygon ether scan and navigate to the events tab where you would see the latest event emitted, which is a deployed event. In my case the url for my deployed contract is https://mumbai.polygonscan.com/address/0x7C40C2af5073132f5C3c5cc04A270a8104Dd5E19#events.
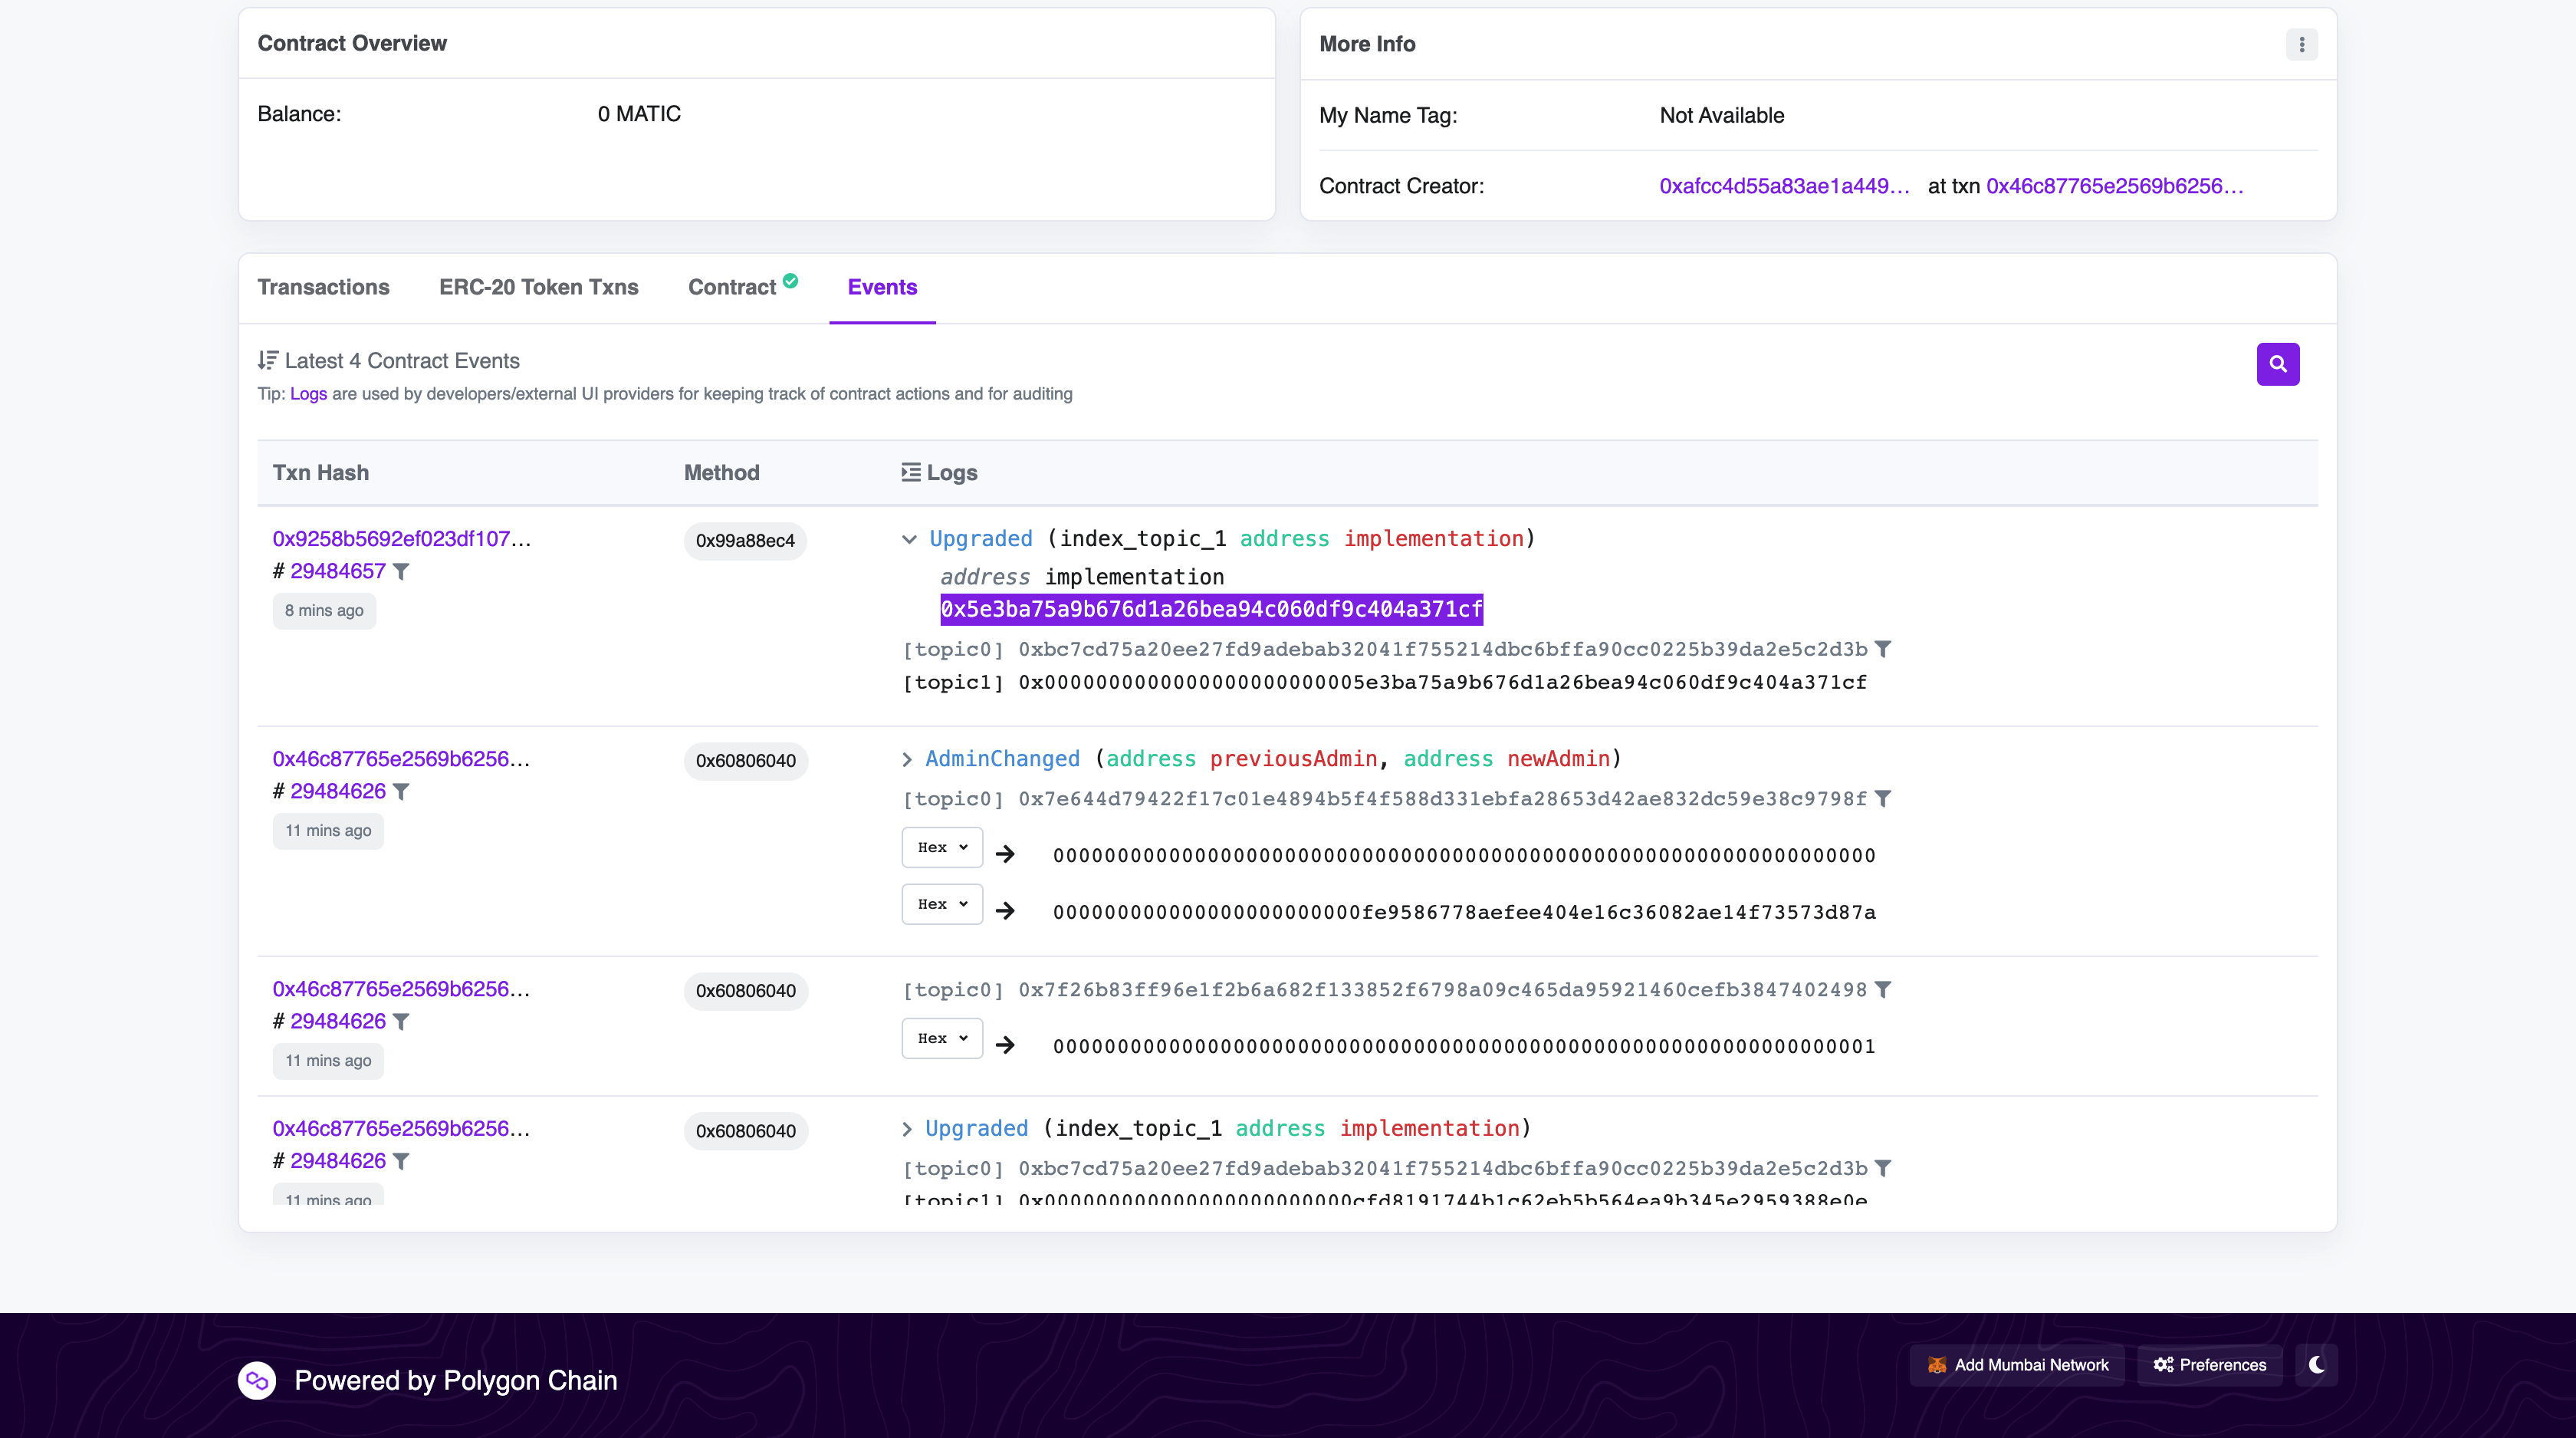
You probably noticed the highlighted address, this is the address of the upgraded contract. So this obviously means that for every upgrade, there's a new implementation contract deployed and this is the only address that gets to change, the proxy contract address always remains constant.
Interact with deployed contract
To interact with our deployed contract, it's usually easier to visit the address on the block explorer and play with the contracts method but in this case, it's going to be a little bit technical to carry out because we are dealing with proxy contracts and we also have imports from GitHub which would also be an issue at some point and would require getting API keys from polygon scan. So to tackle this, we are going to be interacting with our contract using the hardhat tool on the terminal.
Now let’s use the Hardhat console to interact with the upgraded contract.
Run the following command to enter into hardhats interactive node environment.
yarn hardhat console
Your output should look like blow:
Welcome to Node.js v14.19.3.
Type ".help" for more information.
>
Currently, the terminal expects some javascript code and right now, we are set to start writing some code, something you probably are already used to. You can copy and paste the following code into your terminal.
 const LockV2 = await ethers.getContractFactory("UpgradedLock")

 const deployedlockV2 = await LockV2.attach("0x7C40C2af5073132f5C3c5cc04A270a8104Dd5E19")

 await deployedlockV2.withdraw(1)

 let currentBalance =  await deployedlockV2.ownerBalance()
Here's a brief explanation of what's going on there:
We are getting the upgraded contract factory.
Attaching the deployed proxy address to the contract factory.
Call the withdraw function.
check the new balance of the owner.
You might end up with a fail transaction due to errors from your HttpProvider, alchemy. One solution to this is to change to another provider or switch to the goerli test net and make sure to update your RPC URL with one that interacts with the Ethereum goerli network.
Why Polygon?
Things are hard, why make life even harder for yourself or your team? There are a couple of drawbacks with most blockchain networks which include the High cost of transactions on-chain, very slow speed, security concerns, etc. Deploying on the polygon network gives you unbeatable access to very low transaction cost ( almost costs nothing), super fast transaction settlement, high throughput, and still implements the best of security strategies (zk proofs). Polygon offers a variety of solutions for everyone including the polygon supernet, polygon zkEVM, which I strongly recommend you check out and explore one of these unique products and what they have to offer. Want to get started with polygon? Visit their website today and thank me later.
Conclusion
In this long blog post, we have learned how to use the hardhat development framework to deploy smart contracts, upgrade a smart contract using the Transparent proxy pattern, view and read events on the block explorer and finally interact with your deployed contract via the hardhat interactive console. I hope you've learned a couple of new things, in case you have issues with running the code feel free to drop a comment or reach out to me on Twitter. Here's a link to the repository that contains all the code in this tutorial.